The COVID-19 quarantine has left me at home with more time on my hands, which has led me to try out some piano live streaming. I am by no means a professional streamer, and the upcoming jumble of words are a result of my personal experiences and my expeditions into the Google abyss.
And now, here are three levels of setup for anyone who might be interested in live streaming piano!
Level 1: Phone + Adapter + Tripod
Get your phone, get an adapter (like this one) to attach to a tripod, setup the tripod, and then use your streaming app of choice. Done.
Your phone acts as your one-stop shop for capturing all audio/video and streaming it onto the internet, so it will pick up whatever sound and activity is happening in the environment (which can be both good/bad, depending on your needs). For streaming apps, Twitch/YouTube/FaceBook/Instagram/etc all have built-in capabilities to stream straight from the mobile app. You could also look into using something like Streamlabs if you want to add overlays to your stream.
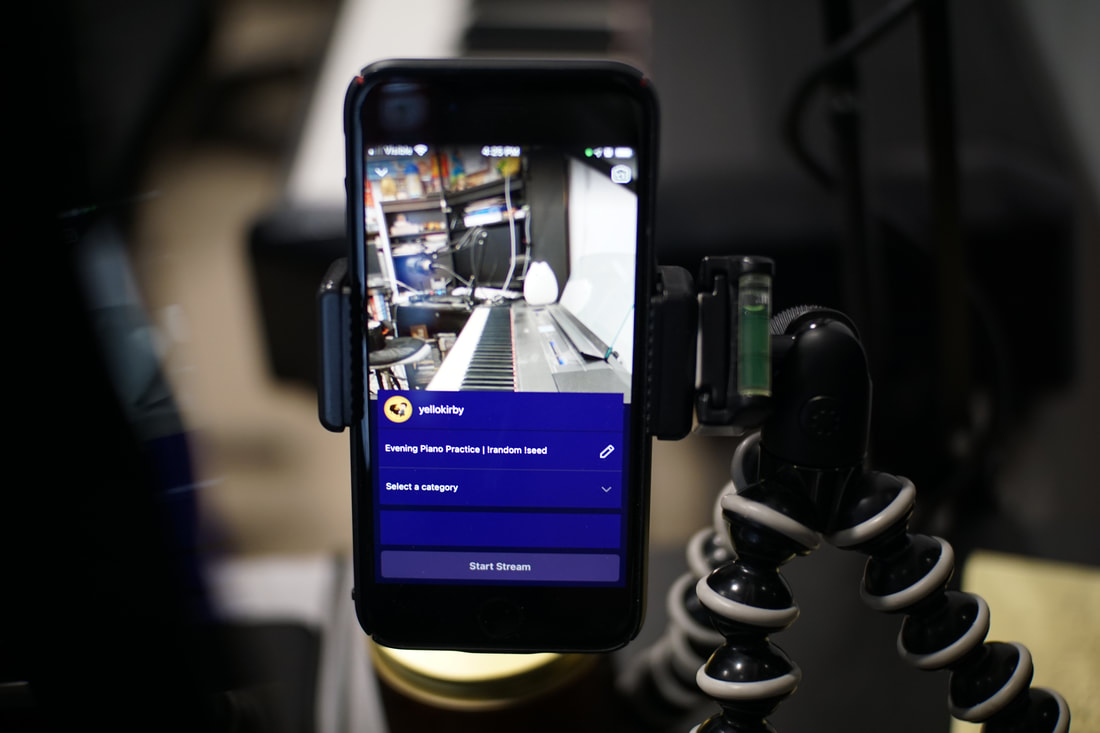
For those desiring a simple single-device solution to live stream your piano, you’re all set – stream away (and tell me where you’re streaming so I can check it out!).
If you’d like to gain some cleaner audio and sharper image quality for your stream, feel free to continue venturing down this post…
Level 2: External Audio/Video + OBS
Once you add in the option of external equipment, the combinations can easily get overwhelming and endless… I’ll be sharing my personal setup that fits my own situation. Best thing to do is simply try something and modify as needed!
Audio
The two main ways to gain better piano audio are:
- Use better mics/a direct line to pickup your piano sound
- Capture MIDI data from your digital piano and play it through an app on your computer
I will be using option 2 for a few reasons: I do not have an acoustic piano in my bedroom to capture audio from, and I’ve found that using a direct line from my digital piano results in way too much unwanted noise.
Capturing MIDI data basically means that your piano sends a bunch of numbers to your computer, and then your computer will take those numbers and run them through an application that can translate those numbers into piano sounds. This requires a keyboard that is capable of sending MIDI, along with a MIDI cable. I play on a Yamaha P515, which is able to use 5-pin MIDI cables as well as MIDI cables that look like printer cables.
The upsides? This produces super clean audio (perhaps too clean for some) and lets you use whatever keyboard sound you’d like.
The downsides? You lose some of the extra nuance that can only come from an acoustic instrument, and you also introduce issues of latency (the small delay that it takes for your computer to get the MIDI data and translate it back into sound).
My virtual instrument program of choice is Pianoteq, which is unique in that it does not use piano samples, but actually models and simulates different pianos to produce sound. They offer a free trial, so definitely check it out if you’re looking for a virtual instrument! You can also Google “piano VST” for more options.
Once you have Pianoteq (or whatever VST you use) up and it is able to produce sound when you play on your keyboard, you are good for audio end!
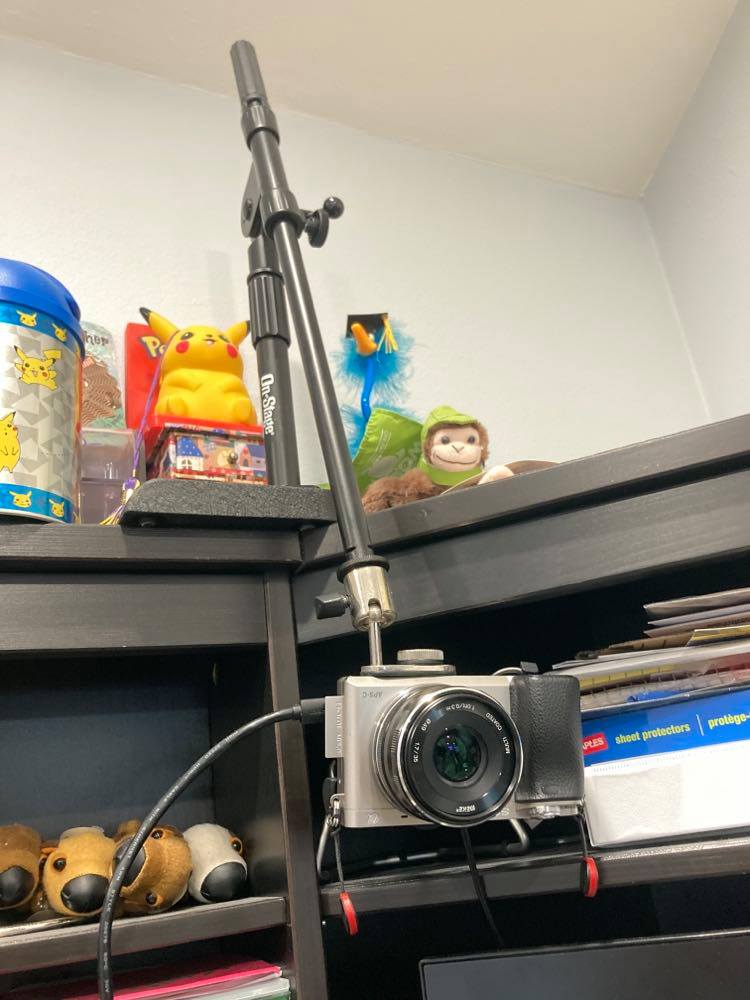
Video
You can essentially use any camera as an external device, whether it be a $20 webcam or an 8K cinema camera. You just need a method of capturing that camera’s feed and sending it to your computer. Webcams usually have a USB cable that you can plug straight into your computer; cameras can involve different dongles/adapters/capture cards to get that video feed transferred over.
I use the the following tools for my personal video feed:
- Sony A6000 (the one mirrorless camera in my possession)
- Meike 35mm F1.7 lens (for that shallow depth of field)
- dummy battery (so I don’t have to worry about keeping the battery charged)
- micro HDMI to HDMI cable (for sending my camera’s video to a capture card)
- capture card (the middle man between my camera and computer)
There are plenty of ways to place your camera in the desired angle using tripods, boom stands, music stands, whatever is in your vicinity. I am currently using a bass drum mic stand with an adapter to attach my A6000 upside down.
The best way to test if your video feed is working is to go through OBS, which is coming right up.
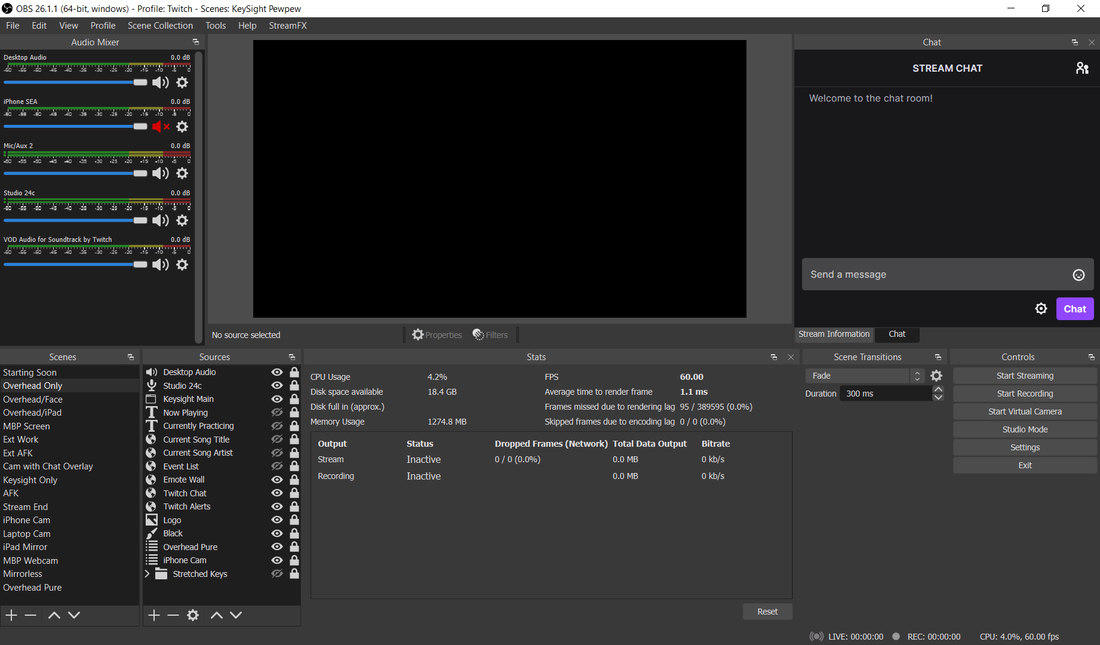
OBS
Now that you’ve got your audio and video prepped, the time has come to bake it into a live stream through OBS.
Once you’ve downloaded OBS, open it up, and add a new audio output capture, and make sure to select the same device that you are using for your VST’s output. The audio bars should move when you play your keyboard and hear the sound coming through your computer.
Next, add in a video capture device, and select the device name that represents the capture card/webcam that you have plugged in. You may need to click around the device list to toggle device to turn on. If the resolution is weird, feel free to select Custom and change the resolution to your liking.
You may want to resize and move your image. Some helpful shortcuts: normal drag corners to resize in fixed ratio, Alt + drag to crop, Shift + drag to stretch. Don’t forget to lock your source in the Sources list in order to fix it in place. There isn’t an undo function within OBS, so be careful what you change!
If you notice that the Video Capture Device bar in your Audio Mixer is moving, click the speaker icon to toggle mute so that only your computer audio is being picked up by OBS. You can leave it unmuted if you want your voice to be picked up by the camera. Otherwise, you may have some extra unwanted audio in your stream.
From here, you can add filters and adjust things to whatever extent you prefer, but you have the main audio and video sources setup in a scene that can be streamed out into the world. One basic thing you could add is an external mic for your voice, which can be added into the Sources panel as an audio input capture.
Head to File > Settings > Stream to select the type of service you prefer to use. Some services allow you to connect your account directly within OBS, which allows you to adjust settings straight from OBS without having to visit the platform’s website.
For encoding settings, I would recommend taking a look at Twitch’s broadcasting guidelines.
Once things are ready, you can click Start Recording on the bottom right to do a test recording, or simply hit Start Streaming to present to the interwebs your beautiful stream with external audio and video feeds!
Level 3: Completely Unnecessary Complications
Are you bored and want to make things totally more complicated than they need to be? Congrats, you’ve come to the right place. This section will have a bunch of bonus elements that you can sprinkle onto your stream to make things a bit more pretty or to add some extra info to your stream.
Overhead Angle + Keysight
Keysight is a Steam application I discovered in my pursuit of finding a nice visualizer, and I find it to be a fun way to add some color and movement to the stream. You can check out my previous post in setting up an overhead cam angle; the only addition is that I am using Camera for OBS Studio to send my iPhone feed into OBS.
Since both Keysight and Pianoteq require MIDI from my piano, I am making use of both MIDI out ports on my Yamaha P515 in order to allow both apps to have MIDI data to read from (I was not able to use one MIDI device for both apps simultaneously). If your keyboard doesn’t have two MIDI outs, you may need to make use of a MIDI splitter or find another method to capture the piano audio.
The final part of the process is to add the sources and move/adjust them in a way that aligns the overhead angle with the visualizer, which is a result of stretching, audio delaying, eyeballing, and other forms of jank. Once you’ve achieved your look/given up on OBS, you are all set for a nice overhead keys angle with a note visualizer.
Overlays/Alerts
If you’ve ever seen extra text/graphics/animations on a stream, those are all the result of extra overlays or alerts being added into the scene. There is a whole trove of overlay tutorials/shops to peruse, and here are a few resources that I have taken a liking to in my scene creations:
- NerdOrDie’s Focus package (premade assets that can be added straight into a scene)
- StreamerSonglist (for adding a song request function and a live-updated currently playing text)
- StreamElements (a home base for overlays, alerts, chat, and more)
Most of these are added into OBS as a browser source or as a local file. I’ve been able to find a YouTube tutorial for nearly any asset I want to add into my scenes, so type away into that search bar.
Alrighty, I hope these different methods of live streaming have given you ideas for your own stream (or at least a nice behind-the-scenes look)! There’s a lot of fun to be had in figuring out a streaming setup, but there are also a whole mess of bugs that can come up. Things will break and janky solutions will be used – know that you are not alone in this lovely troubleshooting process. (One thing I’ve picked up is that when in doubt, just restart. Like literally, restart OBS or restart your computer. There is so much power in rebooting, it’s amazing.)
Feel free to drop me any questions and comments you have, and happy streaming!